Integrating Graphic Elements
Stacey Corbitt
Chapter Overview
A common sentiment about reading and writing, especially among adult learners, is that we wish we could write using lots of pictures and not a lot of words. We hear ourselves say things like “I hate writing,” because “it’s boring” or “I’m terrible at it.” Similarly, many people dislike reading books and documents “without pictures,” again because “it’s hard to understand all those words” or “it’s just so BORING.”
One of the biggest challenges for a technical writer is integrating graphic elements into documents. Visual representation of data, called illustration, is also part of what makes technical writing powerful. Keep in mind that technical documents must be clear, complete, concise, and correct in order to succeed in their purpose. Often, those 4 characteristics are made possible by a writer’s use of photographs, tables, charts, drawings, and diagrams – that is, illustrations – to supplement the words.
The explanations, examples, and exercises in this chapter aim to help students learn the following skills:
- To recognize the rhetorical situations in which illustrations may be employed
- To consider the common types of illustrations and make appropriate choices
- To correctly introduce and discuss illustrations in documents
- To properly apply captions and citations to illustrations
When should you use illustrations in documents?
Recall that the rhetorical situation refers to the context for which we write. Some academic writing genres – essays, for example – do not lend themselves to illustration as a method of clarification. Other types of writing however, like research articles and technical reports, can be much more effective when illustrations are included. Always consider the audience and purpose of the document – as well as of the specific information you are presenting graphically – when you consider including illustrations for purposes of clarity and conciseness.
What must a writer consider when choosing illustrations?
Illustration in technical documents is purposeful. Technical writers have no reason to add pictures for decoration of a document: instead, illustrations specifically support the readers’ understanding of the writing within the document. Illustrations must therefore be clear and easy to read/understand; and they must depict exactly the information represented by the writer. This chapter includes examples of the two types of illustration technical writers may use:
- Tables: Illustration of data presented in a format of columns and rows; often numeric data but may also be text; and
- Figures: Photos, charts, drawings, diagrams, and graphs – all non-table illustrations
See Table 1 for a brief discussion about some of the information a writer might present in graphic form, together with examples of just a few types of illustrations that may be used.
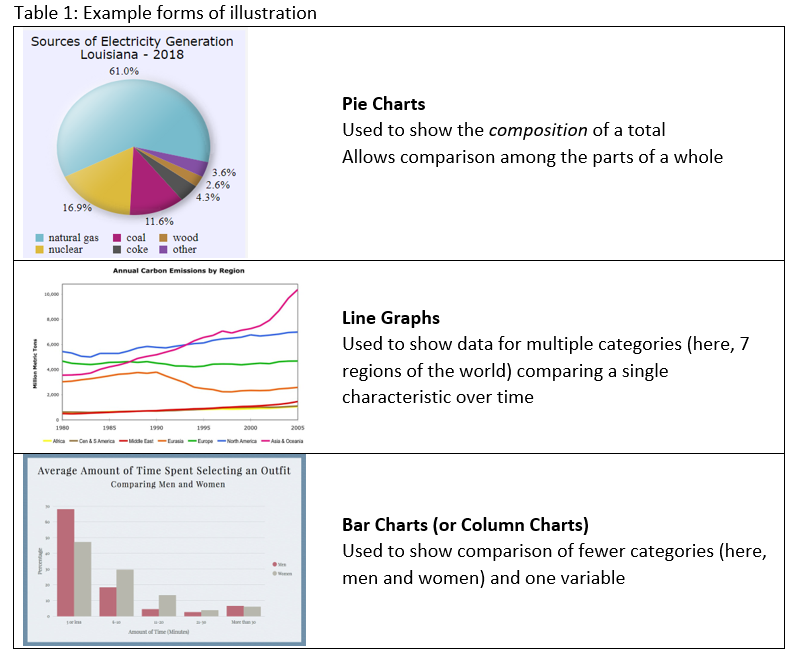
For more detailed description of illustrations, see “Choosing a Good Chart” by noirdream. Additionally, this link presents an infographic sampling of some elements for building graphics, an activity that is outside the scope of this chapter.
How do you integrate illustrations in a document?
Readers must have confidence in the writer and the material provided in the document and supported by the graphics. Use these methods to increase chances of success:
- Introduce illustrations in the text and connect each to the text it supports
- Write and apply accurate captions
- Adequately cite sources of graphic elements
- Select and use only high-quality images that add or clarify information
- Avoid including graphics as filler material
Figure 1 provides an example of an illustration that may be found in a typical scientific document. Please refer to Figure 1 as it is discussed throughout this section.
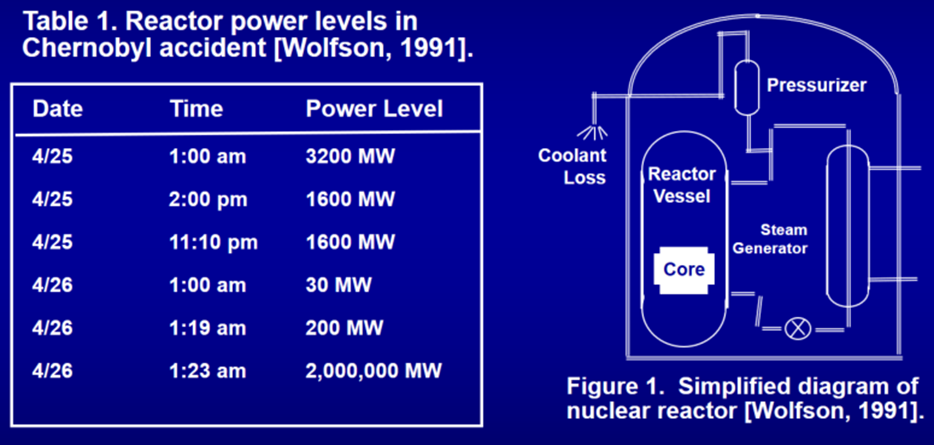
Figure 1. Example of two kinds of illustration with citations (Alley, 1996 pp. 146-148) used with permission from the author.
Introduce illustrations in the text and connect each to the text it supports
Excellent illustrations are those that supplement the text to make the information in a document clear to readers. In other words, a careful writer will not to attempt to include illustrations as replacements for written technical information. Instead, text in the document must introduce the illustration, ideally in the paragraph immediately preceding the graphic.
Signal phrases are often helpful: for example,
As shown below in Figure 1, the Chernobyl nuclear reactor is a closed system ….
A comparison of power levels on the accident date (see Table 1 below) indicates ….
Sometimes an illustration’s introduction in the text may appear near the end of a page, resulting in placement of the illustration on the next page. Such an instance is not an error or cause for concern: however, it is one reason for careful introduction and captioning of every illustration. Readers must be able to quickly connect the introductory text with the graphic.
Write and apply accurate captions
Every illustration in a technical document must include a caption. Think of this part as an identifier for the image. Captions may be presented in the form of a title, or can be one or more sentences long depending on considerations like the complexity of the concept or the graphic.
An accurately written caption is comprised of either 2 or 3 elements:
- a label (either Figure or Table) together with a numeric identifier;
- a brief description of the contents of the graphic; and
- an in-text citation for graphics created by a source other than the writer.
Note the placement of the captions in the illustrations in Figure 1 above. APA style requires the caption to appear before a table. Conversely, a figure in an APA document includes a caption immediately after the graphic.
Adequately cite sources of graphic elements
Throughout this textbook, the importance of choosing integrity is reinforced: indeed, success at any level is impossible without a conscious choice to maintain academic honesty. Just as with any non-original material, the graphic elements writers use to make documents clear, concise, complete, and correct must be attributed to their original sources. As shown in Figure 1 above, in-text citations containing the author’s name and the year of publication are provided in the captions. The form of in-text citations varies depending on the style guide a writer uses: nevertheless, in-text citations are required when graphics come from an outside source.
Select and use only high-quality images that add or clarify information
Technical writers have a powerful tool in illustrations. Graphic elements increase our ability to be clear and concise by presenting information in visual ways that support written text. Successful illustrations are therefore those that are clear; easy to see; unambiguous; properly labeled and/or keyed; and, in many cases, can be printed (if electronic) or reproduced (if published in printed form).
Avoid including graphics as filler material
Students who are new to the technical style of writing are often challenged by the shift in emphasis from “total-page/word count” requirements to “complete-but-concise” documents. While some specific assignments may allow for limited use of graphics “for looks” – an attractive photo or a logo on a cover, for example – illustrations must have a purpose in documents. The purpose of illustrations is never to make a document reach an assigned page count: instead, the only appropriate purpose for using illustrations is to support the written text of the document. Illustrations help make texts clear, complete, concise, and correct.
Chapter conclusion
Technical writers rely heavily on use of illustrations to ensure documents are clear, complete, concise, and correct for the defined audience and purpose. Simply adding lovely pictures, however, is not illustrating. Instead, introduce illustrations in the text; connect each to the text it supports; provide appropriate captions; cite sources of graphic elements; and select or create high-quality images that clarify information presented in text.
Activity: What are the steps to follow when incorporating graphics in a document?
Read and discuss the following example set of instructions with your classmates as directed by your instructor. Answer the questions and be prepared to discuss your answers in class.
How to Perform an Oil Change
Step 1: Start your car and let it warm up to normal operating temperature.
Step 2: Park your car in a level spot (garages work well) and shut it off. If needed, jack up the front of the car and put in on jack stands.
Step 3: Locate the drain plug. It will be somewhere on the oil pan toward the bottom, and will be the lowest point on the engine.
Step 4: Position the drain bucket under the car so that it can catch oil when the drain plug is removed.
Step 5: Remove the drain plug. Using a ratchet with the correct size socket, turn the drain bolt counter-clockwise until it breaks loose, then use your fingers to turn it out. When it is on the last few threads, be ready to pull it out quickly to avoid hot oil splashing everywhere.
Note: It may be necessary to reposition the drain bucket as the oil drains out.
Step 6: While the oil is draining, clean off the drain plug and any tools that got oil on them with a rag.
Step 7: When the oil is done draining, wipe down the surface around the drain and re-install the drain plug. Turn it clockwise by hand until it contacts the oil pan, then, using a torque wrench, tighten it to the factory spec (see owner’s manual).
Note: It is crucial that the drain bolt is tightened to the proper torque. Too tight and it will fall out; too loose and it can strip the threads on the oil pan.
Step 8: Reposition the drain pan so that is directly under the oil filter.
Step 9: Remove the oil filter. Grab it with your hand a twist it counter-clockwise. Once it is off gently set it in the drain bucket or a trash can.
Note: If the oil filter is stuck, either from being too tight or being covered in oil, wipe it clean and use a rubber glove to get a better grip.
Step 10: Install new oil filter. Fill the new oil filter about halfway up with new oil. Then, apply a light film of oil to the O-ring on the oil filter. To install it on the car, thread it on clockwise until the O-ring contacts its sealing surface, then turn it an extra ¾ of a turn.
Note: It may be helpful to mark the oil filter with a marker when it contacts the sealing surface so you can identify where ¾ of a turn is.
Step 11: With the oil filter installed, and the drain plug in and torqued to spec, it is time to add fresh oil. Locate the oil fill cap and unscrew it.
Note: Depending on the vehicle, the oil fill may be a simple plug that goes in the valve cover, or it may be a tube elsewhere on the engine. Consult your owner’s manual for the exact location.
Step 12: Insert a funnel into the fill hole and add the amount of oil specified by the manufacturer (See Owner Manual).
Step 13: Re-install the filler cap and start the car. Let in run for a minute or two, then shut it off, and give it a minute to let the oil make its way back down to the oil pan.
Step 15: Check how much oil the car has. Pull out the dipstick and wipe it clean with a rag. Then, insert it back into its hole all the way, and pull it out. The highest point that the oil got to on the dipstick is how much oil is in the car.
Step 16: Top off if needed. The oil level should be from between about halfway between “L” and “F” to “F”.
Note: The distance between “L” and “F” is one quart.
Your car is now ready for another 3000 miles of driving, and make sure to properly dispose of the old oil.
- Assume you and your classmates are the intended audience for this technical document. Discuss whether you think the instructions are usable as written: why or why not?
- How might you obtain or create images to use for illustrations in this document? Discuss the subject matter and number of images you think would be appropriate.
3. Locate at least one webpage or electronic document you might consider using as a source for images to illustrate these instructions. Provide the complete URL below and explain your reason(s) for choosing the source.
Homework
Revise the How to Perform an Oil Change instructions document to improve its clarity and usability. You may want to review the “Writing Instructions” chapter as you complete this assignment. Be sure to integrate appropriate illustrations using the conventions provided in this chapter and include an end-of-document references section.
References
Alley, M., The Craft of Scientific Writing (3 Ed.) (1996). New York, New York: Springer.
“Average Time Spent Selecting an Outfit – Men vs. Women” by bellaellaboutique License: CC-BY-SA 2.0.
“Carbon Emissions by Continent Chart” by Matt Lemmon License: CC-BY-SA 2.0.
“Choosing a Good Chart” by noirdream License: CC BY-SA 2.0.
“Graphic Table Symbols Vector Chart” by Yuri_B License: CC0 by Pixabay.
